Airbnb self check-in: How to master the first 60 seconds
Most check-in problems are guesswork problems: a pin at the street address instead of the real entrance, a dark entry, two doors that look alike. This guide walks the route the way a guest does, from the curb to the first lamp, with the kind of fixes that take the guesswork out of the equation.
The rule: curb to a lit room, no guessing
A guest should get from the curb to a lit living room without guessing once. Not which door, not which code, not where the light switch is. Basically, no surprises.
You already know what happens when that breaks. You get a text at 11pm from someone standing in a dark parking lot with a suitcase wondering why the code to the lock box isn't working (it's because they are using the wrong box). Not only is it an instant facepalm and a blow to your sleep, but it also likely will come with an even heavier hit to your check-in rating.
The fix isn't one thing. It's five small ones, and all of them can be done before your next stay.
1. Map two routes, not one
Guests show up two ways, and each needs its own directions.
A single-family home with a driveway can usually get away with one route. But if you're property is an apartment, condo or anything with a shared entrance, you'll need to do a bit more.
The pin matters most. Don't send guests the property's street address and hope they figure it out. Drop the pin at the first place they actually need to be: the gate, the callbox, the lockbox, or the closest guest parking spot to the door. That address may not match the property's, and that's completely fine.
In a building with long-term residents, say so that to the guest up front. Tell guests the neighbors and leasing office can't help with check-in, and give them your number instead. It saves everyone an awkward conversation in the lobby.
2. Solve every locked point, not just the front door
Walk the route and count the locks between the curb and the bed. The front door is one. A building door, a pool gate or a parking garage might add more.
The front door: a keypad smart lock. We'd put a Schlage or Yale smart lock on every guest door. No physical key to lose, copy or forget to return. You set a code for each stay, and when something goes sideways you can manage access from your phone instead of driving over.
Anything that needs a physical key or fob: a lockbox. If a guest needs a fob to get into the building or a key for a gate, put it in a lockbox at a spot that makes sense on the route. Next to the door it opens, not around the corner by the dumpsters.
Inside the door: a place for it to live. Put wall hooks or a small coat rack by the entry, about 5' off the floor, so that fob ends up in the same place every stay. Your cleaners will know where to look, and so will the next guest.
3. Light the way in
When a guest opens the door, a light switch should be within reach, and that light switch should connect to a light that actually lights the room. If the first thing they hit is an artsy sconce on the other side of the living room, their first experience inside the door is still going to be on that happens in the dark. Same for every bedroom door. Picture someone arriving at night who's never been inside, and make sure they never have to cross a dark room to find a lamp.
No overhead fixture by the door? Look for an outlet controlled by a wall switch, which is common in older living rooms and bedrooms. Plug a floor or table lamp into it and the switch now works the lamp. A Bluetooth wall switch paired to a plug-in lamp is the last resort. Just be sure to light as much of what a guest needs to see as possible, as soon as possible.
Then make it hard to undo:
- Label it. Put a small "turn me on" label on the switch plate and the lamp base. Guests learn the switch works the lamp, and your cleaners know which lights to leave on when they head out.
- Protect the plug. An outlet cover over the lamp's plug stops guests from unplugging it to charge a phone, which quietly breaks your entry lighting for the next stay.
- Leave them other outlets. Keep enough open outlets for phones, laptops and the cleaning team's vacuum, so nobody's tempted to unplug yours.
- Use the right bulbs. Soft white LED, about 60W equivalent. A dim bulb in the entry lamp undoes all of this.
4. Make the door say "you're here"
The last 20 feet are where guests second-guess themselves. Make the right door obvious.
- Is the address visible from the street. Check it at night too. If you're part of a larger apartment building, note defining characteristics of the front doors.
- Outdoor lights working. Have your cleaners check porch and path lights at every turnover, so a burned-out bulb gets swapped before a guest mentions it.
- A doormat, squared to the door. It keeps your floors cleaner, and it doubles as a signal: this is the one. Put a mat at every guest entrance.
- A clean, working front door. This should go without saying, but fresh paint, a clean surface and a door that doesn't stick. It's the first thing guests touch, and it shows up in your exterior photo.
- Bins out of sight. Move trash cans out of the path and out of the line of sight from the curb.
5. How to write an arrival guide with pictures
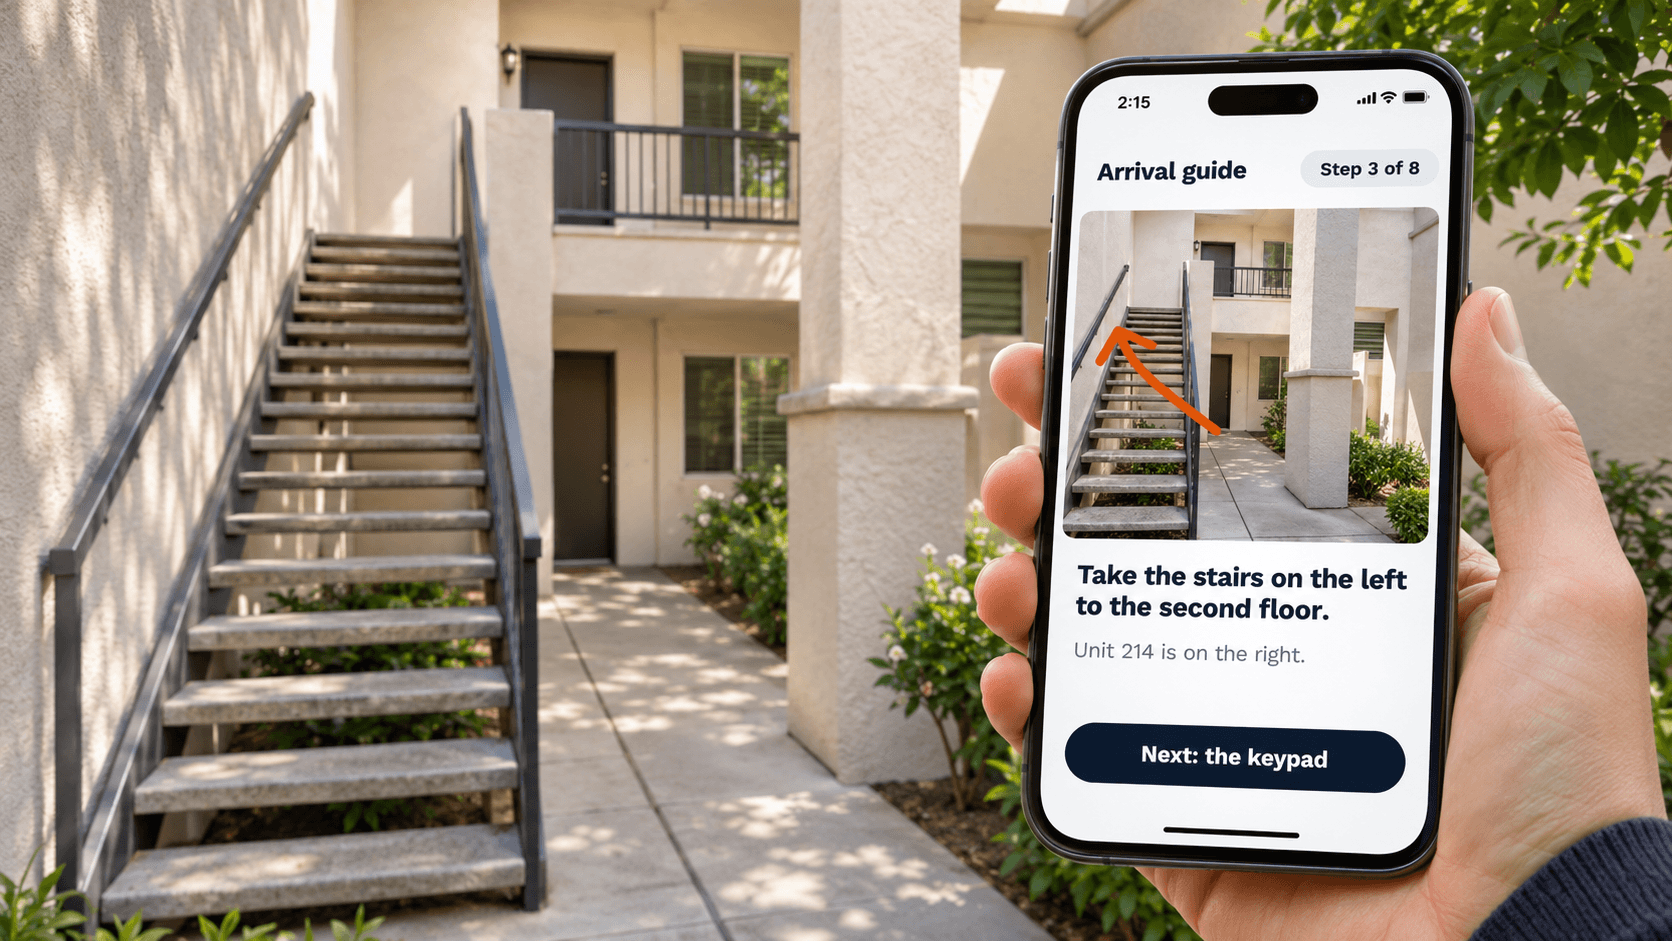
Put your two routes into a short photo guide and send it before arrival. Paragraphs of directions don't survive a guest reading them on a phone while walking.
- Start at the pin. The first photo is what the guest sees standing at the pin: the gate, the callbox or the parking spot.
- One photo per decision. Every time a guest could turn the wrong way, take a photo from where they'd be standing. Add an arrow and one line: "Take the stairs on the left to the second floor."
- Show the lock. The last photos show the lockbox or the Schlage or Yale keypad, with a line on how to enter the code.
- Add special instructions only where needed. Temporary parking options, a gate that sticks, who to call. Keep it to the step it applies to.
Then test it. Hand the guide to someone who's never been to the property and have them follow it, start to finish, ideally after dark. Any spot where they pause or ask a question gets a better photo or a clearer line. Operator crews have someone audit every guide this way for accuracy, photo quality and spelling, and you can do the same with one friend and one evening.
Run the arrival yourself
Before your next stay, arrive like a guest. Start at the pin, follow your own guide, and check off each step:
- The pin lands at the real first stop (gate, callbox, lockbox or parking), not just the street address
- Rideshare and driving routes are both covered, if the property needs both
- Every locked point on the route has a solution: smart lock, lockbox or code
- The Schlage or Yale keypad accepts this stay's code, and the batteries aren't low
- The address is readable from the street, after dark
- Porch and path lights work
- The doormat is down and squared to the door
- A light switch is within reach as you step inside, and in every bedroom
- "Turn me on" lamps come on from the wall switch
- Key hooks by the door are ready for the fob
FAQ
What's the best check-in method for an Airbnb?
Self check-in with a keypad smart lock, like a Schlage or Yale, plus a photo arrival guide. Guests get in without a key handoff, and you can manage access remotely.
Do you need a lockbox if you have a smart lock?
Only if something else on the route needs a physical key or fob, like a building door, gate or garage. Put the lockbox next to the door it opens.
What should Airbnb arrival instructions include?
A pin at the real first stop, one photo for every place a guest could take a wrong turn, how to use the lock, and any special notes like parking or who to call.
How do you make check-in easier at night?
Keep porch and path lights working, make the house number readable from the street, and put a light switch within reach of the door.
How do you test your check-in?
Have someone who's never been to the property follow your guide, start to finish, after dark. Fix every spot where they pause.